Technical Parameter
- Set temperature: 0—99 degrees
- Actual temperature: 0—200 degrees
- Working temperature: 30—80 degrees
- Setting time: 0—99 minutes
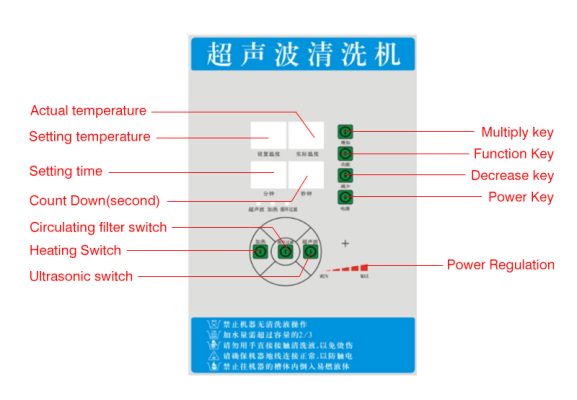
Key Description:
Set temperature: Display the current set temperature.
Actual temperature: Display the current actual water temperature.
Set time: Display the current set time, unit: minute.
Countdown: Display the decrement time in seconds when the ultrasonic is working.
Heating switch: press once to turn on the heating, press again to turn off.
Circulation filter switch: press to turn on the circulation filter system (this system needs to be customized), and then press to close.
Ultrasonic switch: Press it to turn on the ultrasonic wave, and press it again to turn it off. After the ultrasonic is turned on, it will automatically turn off when the time is up.
Increase key: used to adjust the setting time and temperature increase.
Decrease key: used to adjust the setting time and temperature reduction.
Function key: switch the adjusted temperature or time.
Power button: Press it once to turn off the control power, and press it again to turn it on. When the heating and ultrasonic work are turned off, the corresponding work is also turned off.
Power adjustment: used to adjust the ultrasonic power.
Adjustment of temperature and time:
Time setting: Press and hold the “Function” button for 3 seconds. The numbers in the time window will start blinking. Release the button, then press the “Increase” or “Decrease” button to adjust the desired cleaning time. After adjusting the time, press the “Function” button once to save and exit. Alternatively, it will automatically save and exit after 20 seconds of inactivity. Press the power button once to start the ultrasonic countdown, and the ultrasonic function will automatically turn off when the set time elapses.
Temperature setting: Press and hold the “Function” button for 3 seconds. The numbers in the time window will start blinking. Release the button, then press the “Function” button again to access the temperature setting. The numbers in the temperature window will start blinking. Use the “Increase” or “Decrease” button to adjust the desired cleaning temperature. After adjusting the temperature, press the “Function” button once to save and exit. Alternatively, it will automatically save and exit after 20 seconds of inactivity. Press the heating button once to start the heating process, and the heating will automatically stop when the set temperature is reached. If the actual temperature falls below the set temperature, heating will resume to maintain the constant temperature of the water tank.
Note: Temperature unit is Celsius (°C).
Time unit is minutes (min).
Countdown unit is seconds (sec).
User Guide:
- Prohibit powering on the machine without water (liquid) to avoid damage from dry heating.
- Ensure that the water/liquid level is above half of the tank’s capacity; for models with heating function, if using the heating feature, the water/liquid level should be above two-thirds of the tank’s capacity.
- Rotate the switch in the correct direction; reverse rotation is strictly prohibited.
- Select a suitable cleaning agent based on the product’s stains for better cleaning results.
| Warranty |
| 1. Machine model: Body number: |
| 2. Date of purchase: |
| 3. Warranty period: one year. From the date of purchase, if a failure occurs due to normal use within one year,
Free warranty can be enjoyed with this card, invoice or receipt. |
| 4. Man-made faults, unauthorized disassembly, repairs, improper operation following the instructions in the user manual, and lack of reasonable maintenance are not covered under the warranty. For repair services outside the warranty coverage, applicable material costs will be charged based on the actual situation. |
Machine Maintenance:
- The ultrasonic driver circuit board should be kept dry and stored away from humid environments to prevent damage to the machine.
- When the ultrasonic cleaning machine is not in use, turn off the power to the ultrasonic generator.
- Avoid collisions or severe vibrations to the machine.
- Keep the ultrasonic generator and cleaning tank away from heat sources and dusty areas.
- Try not to operate the ultrasonic cleaning machine for extended periods; take breaks of at least 5 minutes after a few hours of operation.
- Place the machine in a well-ventilated area to facilitate heat dissipation.
- To ensure effective cleaning, replace the cleaning solution promptly.
- Avoid using strong acidic or alkaline cleaning agents if possible.
- After completing the cleaning process and turning off the machine, drain the cleaning solution if the machine will not be used for an extended period, and clean the tank and surrounding areas.
- Strictly prohibit powering on the machine without water (liquid).
- When using flammable liquids (such as alcohol, PCB cleaner, acetone, etc.) for cleaning, use caution when heating the solution!